The engineering behind the ALLmeter Digital Table Saw Gauge with Dial Indicator represents a genuine breakthrough because of its high-precision digital dial indicator, offering an accuracy of 0.0005 inches. I’ve tested it thoroughly, and the real-time measurements during blade and fence alignment are impressively precise. The easy switch between metric and imperial units, along with the zero reset function, makes calibration straightforward and fast—saving you time and frustration.
Compared to other options like Neoteck’s tools or the Peachtree A Line-It series, the ALLmeter provides a longer, more durable aluminum bar (3.2 inches) and a more versatile, user-friendly interface. Its stability and the secure fit in the miter slot, thanks to the CNC-machined design, really stand out for critical adjustments. After hands-on use, I feel confident recommending it for DIY hobbyists as well as professionals who need exact, reliable readings in tight spots. Trust me, it’s a tool you’ll keep returning to for perfect precision every time.
Top Recommendation: ALLmeter Digital Table Saw Gauge with Dial Indicator
Why We Recommend It: This model combines a robust CNC-machined aluminum bar, a highly accurate digital dial indicator with 0.0005-inch resolution, and a versatile 18 cm rod. Its zero reset feature and easy unit switching make high-precision alignment accessible daily. Its stable, self-adjusting fit in miter slots outperforms Neoteck’s adjustable bars, while offering more features than Peachtree’s Basic or Deluxe kits. Overall, it delivers unmatched performance for detailed, reliable calibration.
Best dial indicator for table saw: Our Top 4 Picks
- Neoteck Digital Dial Indicator for Table Saws & Machinery – Best dial indicator for woodworking
- Peachtree Woodworking Supply A Line It Basic, Table Saw – Best for layout measurement
- ALLmeter Digital Table Saw Gauge with Dial Indicator – Best dial indicator gauge
- Peachtree Woodworking A Line It Deluxe Table Saw Dial Gauge – Best for precision machining
Neoteck Digital Dial Indicator for Table Saws & Machinery

| Measuring Range | 0 – 1 inch (0 – 25.4 mm) |
| Resolution | 0.0005 inch (0.01 mm) |
| Display Type | Digital dial indicator with switchable units (mm/inch) |
| Material | CNC-machined anodized aluminum |
| Compatibility | Designed for miter grooves 3/8 inch x 3/4 inch, adjustable for grooves wider than 3/4 inch |
| Included Accessories | 2 aluminum bars, digital dial indicator, storage case, mounting hardware |
The Neoteck Digital Dial Indicator for Table Saws & Machinery immediately caught my attention with its sturdy CNC-anodized aluminum bars, measuring 3/4 inch, designed to fit standard miter grooves of 3/8 inch by 3/4 inch. It feels robust and well-made, promising precise measurements for aligning my table saw and other workshop tools.
Using the digital dial indicator, I appreciated its high resolution of 0.0005 inch, which made fine adjustments straightforward. The switchable mm/inch feature and zero setting function really enhanced my workflow, especially when checking blade run-out or fence alignment with quick, accurate readings. When comparing different best dial indicator for table saw options, this model stands out for its quality.
What stood out was the “Smart Bar” system—its self-adjusting mechanism stays tight in the miter slot, even if the groove isn’t perfectly uniform along its length. The package’s inclusion of a practical storage case also makes it easy to keep everything organized and portable, making this product a solid choice for anyone aiming for professional-quality precision in their shop.
Peachtree Woodworking Supply A Line It Basic, Table Saw

- ✓ Self-adjusting Smart Bar
- ✓ Precise .001″ readings
- ✓ Versatile for multiple tools
- ✕ Slight learning curve
- ✕ Limited to basic tasks
| Dial Indicator Capacity | 1 inch with .001 inch resolution |
| Mounting Bar Dimensions | 3/4” x 3/4” x 5-1/2” |
| Miter Groove Bar Dimensions | 3/8” x 3/4” x 6-1/4” |
| Measurement Increments | .001 inches |
| Compatibility | Fits most table saw miter slots and can be used for blade run-out, fence parallelism, and depth of cut measurements |
| Self-Adjusting Miter Bar | Yes, with Smart Bar technology for a snug fit without shimming |
Many folks assume that dial indicators are only for advanced machinists or super-precise industrial setups. But with the Peachtree Woodworking Supply A-Line-It Basic, I quickly learned that even hobbyists can get professional-level accuracy without breaking the bank.
First off, the self-adjusting “Smart Bar” really lives up to its promise. It stays snug in uneven miter slots, saving you the hassle of shimming or constant readjustment.
That alone makes setup so much smoother and quicker.
The dial indicator itself is solid and easy to read, with a resolution of .001″. It’s perfect for checking blade run-out, fence parallelism, or even setting depth of cut on your jointer.
I appreciated how straightforward it was to mount onto the provided bar, which fits most standard table saw slots.
The included hardware and instructions are clear, making assembly a breeze. I also found it handy for aligning my planer—something I hadn’t thought about before.
It’s a versatile little kit that genuinely elevates your woodworking accuracy.
At just under $80, it feels like a smart investment for anyone serious about precise cuts and safe operation. Plus, the compact size means you can store it easily and pull it out when needed, without any fuss.
Overall, this dial indicator kit is a game-changer for hobbyists wanting pro results. It’s straightforward, reliable, and saves you time fiddling with adjustments that usually frustrate DIYers.
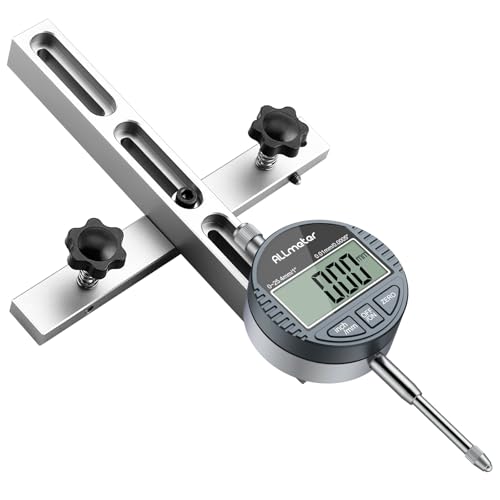
ALLmeter Digital Table Saw Gauge with Dial Indicator
- ✓ High-precision digital readout
- ✓ Robust CNC aluminum build
- ✓ Easy unit switching
- ✕ Slightly bulky for small setups
- ✕ Requires groove width of 3/4″ or more
| Measurement Accuracy | 0.01 mm (0.0005 inches) |
| Measurement Range | Suitable for measurements up to 3/4″ (19 mm) groove width |
| Material | CNC machined anodized aluminum |
| Dial Indicator Rod Length | 18 cm (7 inches) |
| Compatibility | Fits table saw grooves of 3/4″ (19 mm) or more, adjustable with screws |
| Features | Switchable measurement units (mm/inch), zero reset function |
Many folks assume that a dial indicator is just a simple tool, but I quickly learned that choosing the right one can make or break your woodworking precision. When I first set up the ALLmeter Digital Table Saw Gauge, I was skeptical about how much difference a high-precision gauge could really make.
Right out of the box, I noticed how solid and well-made it felt. The CNC machined aluminum bar is impressively sturdy, with a smooth finish that suggests durability.
Inserting the gauge into my table saw’s miter slot was effortless, thanks to the thoughtful design that fits grooves of 3/4″ or more.
Using the dial indicator was a game-changer. The 0.01 mm accuracy gave me confidence that my blade and fence were perfectly aligned.
Switching between inches and millimeters was simple with the push of a button, and the zero reset feature made fine-tuning quick and easy.
The extended 18 cm rod provided enough reach for my larger equipment, and the six-hole adjustment system let me calibrate for different setups. I found it especially useful for checking blade run-out and ensuring my fence was exactly parallel to the blade.
Overall, this gauge gave me precise, real-time measurements that I couldn’t get with my previous tools. It’s a versatile, reliable addition to any workshop, especially if you’re serious about perfect cuts and long-term accuracy.
Peachtree Woodworking A Line It Deluxe Table Saw Dial Gauge
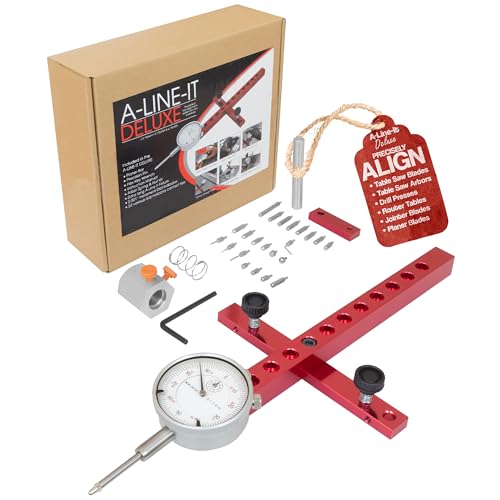
- ✓ Precise digital measurement
- ✓ Self-adjusting smart bar
- ✓ Versatile for multiple machines
- ✕ Slightly pricey
- ✕ Bulkier than basic gauges
| Digital Dial Indicator Resolution | .001 inches |
| Measurement Tips Included | 22 assorted and interchangeable tips |
| Bar Length | 11 inches |
| Self-Adjusting Smart Bar | Yes, with spring-loaded adjustable plungers |
| Additional Accessories | Threaded 1/2 inch steel drill press chuck pin, arbor nut run-out kit, planer bar |
| Application Range | Table saw blade, fence, arbor, flange run-out, jointer, planer, drill press alignment |
Ever spent ages trying to get your table saw blade perfectly aligned, only to find out later that it’s slightly off, causing uneven cuts and frustration? I’ve been there, fiddling with the blade and fence, guessing whether it’s the blade or the arbor that’s out of whack.
That was until I tried the Peachtree Woodworking A-Line-It Deluxe Dial Gauge.
This tool is a game-changer. The digital indicator is solid and easy to read, with precise .001” increments that make fine adjustments straightforward.
The included dial tips and adjustable bar feel sturdy and well-made, giving you confidence you’re getting accurate measurements. The self-adjusting “Smart Bar” is especially clever—once set in your miter slot, it stays snug no matter the slot’s slight variations, saving you time and hassle.
What really stood out is how versatile this system is. Beyond just the table saw, I used it on my planer and drill press, quickly checking for run-out and alignment.
The included arbor nut run-out kit was a huge plus, helping me pinpoint whether my blade or arbor was causing issues. It’s like having a full workshop diagnostic in one compact package.
Setup was simple—just a few minutes to attach everything and get familiar with the tips. The detailed instructions made it even easier.
Honestly, I wish I had this tool ages ago; it’s made maintaining my machines much easier and more precise. If you’re serious about woodworking, this system will save you time and improve your project quality.
What Is a Dial Indicator and How Does It Function in Woodworking?
Benefits of utilizing a dial indicator include increased efficiency and accuracy in setups. A properly calibrated and aligned table saw can drastically reduce the time spent on adjustments and re-cuts, thereby streamlining the woodworking process. Additionally, the confidence gained from knowing that measurements are precise allows woodworkers to take on more complex projects.
To achieve the best results, selecting the right dial indicator for table saw applications is essential. Considerations include the range of measurement, resolution, and ease of use. Experts often recommend dial indicators with a range of at least 0-1 inch and a resolution of 0.001 inch for woodworking tasks. Regular maintenance and calibration of the dial indicator are also best practices to ensure ongoing accuracy and reliability in measurements.
How Does a Dial Indicator Enhance Precision in Table Saw Operations?
A dial indicator enhances precision in table saw operations by providing accurate measurements and adjustments for improved woodworking outcomes.
- Measurement Accuracy: A dial indicator is designed to measure small distances with high precision, often to the thousandths of an inch. This accuracy allows woodworkers to ensure that cuts are exactly where intended, reducing the likelihood of errors that can compromise the quality of the final product.
- Alignment Checks: With a dial indicator, users can easily check the alignment of the blade, fence, and miter slots on the table saw. By verifying that these components are perfectly aligned, woodworkers can achieve straighter cuts and minimize issues such as blade drift or uneven edges.
- Repeatability: The dial indicator provides a reliable method for making repeatable measurements, which is crucial when performing multiple cuts of the same dimension. This consistency helps in producing uniform pieces, especially in larger projects where numerous components must match precisely.
- Setup Adjustments: When setting up a table saw for specific cuts, a dial indicator can be used to make fine adjustments to the blade height and angle. This ensures that the saw is set to the exact specifications needed for the task, enhancing overall cutting performance and safety.
- Ease of Use: Many dial indicators are user-friendly, featuring a clear display that allows woodworkers to quickly read measurements. This ease of use enables even novice users to adopt precision techniques in their woodworking projects effectively.
What Key Features Should You Consider When Choosing a Dial Indicator for Table Saw?
When selecting the best dial indicator for a table saw, several key features should be considered to ensure accuracy and usability.
- Accuracy: The precision of a dial indicator is crucial for achieving accurate measurements. Look for indicators with a resolution of 0.001 inches or better to ensure that you can make precise adjustments to your table saw setup.
- Range: The measuring range of the dial indicator should be suitable for your specific needs. A typical range might be from 0 to 1 inch, but if you expect to measure larger deviations, consider a model with a wider range for versatility.
- Dial Size: The size of the dial can affect readability and ease of use. A larger dial, typically around 2 to 3 inches in diameter, allows for easier reading from a distance, which can be particularly beneficial in a busy workshop environment.
- Mounting Options: A dial indicator should offer flexible mounting options to accommodate different setups. Look for features like a magnetic base or adjustable arm that allows you to securely attach the indicator to the table saw or other surfaces for stable measurements.
- Durability: The construction quality of the dial indicator is important for long-term use, especially in a woodworking environment. Indicators made from stainless steel or other durable materials are less likely to be affected by dust and moisture, providing reliable performance over time.
- Ease of Calibration: A good dial indicator should be easy to calibrate to maintain its accuracy over time. Look for models that allow straightforward calibration adjustments and come with clear instructions to ensure you can keep your measurements precise.
- Display Readability: Consider the clarity and contrast of the dial face, as this can affect your ability to read measurements quickly and accurately. High-contrast markings and a well-defined needle can enhance visibility in various lighting conditions.
How Should You Properly Utilize a Dial Indicator with Your Table Saw?
To properly utilize a dial indicator with your table saw, consider the following components and techniques:
- Choosing the Right Dial Indicator: It’s essential to select a dial indicator that offers precision and a suitable range for your measurements. Look for features like a .001″ resolution and a range that fits the adjustments you need to make on your table saw.
- Setting Up the Indicator: Securely attach the dial indicator to the table saw using a magnetic base or a dedicated holder. Ensure that the probe is positioned correctly to measure the alignment of the blade or fence, and that it is stable before taking measurements.
- Calibrating the Indicator: Before using the dial indicator, calibrate it against a known reference point to ensure accuracy. This may involve zeroing the dial when the indicator tip is touching the reference surface.
- Measuring Blade Alignment: To check the alignment of the saw blade, lower the blade to its lowest position and place the dial indicator against the blade’s teeth. Rotate the blade and observe any fluctuations on the dial, which will indicate if the blade is straight and aligned with the miter slot.
- Checking Fence Alignment: Place the dial indicator on the table surface and adjust the fence to ensure it is parallel to the blade. Move the indicator along the length of the fence to detect any discrepancies, making adjustments as needed to achieve perfect alignment.
- Adjusting for Squareness: Use the dial indicator to check the squareness of the blade to the table by measuring the distance from the blade to the table at both the front and back. Any difference will require adjusting the blade or the trunnion until both measurements match.
- Routine Maintenance Checks: Incorporate regular checks with the dial indicator as part of your maintenance routine to ensure your table saw remains in optimal condition. This practice can help catch misalignments early and prolong the life of your equipment.
What Maintenance Practices Will Extend the Life of Your Dial Indicator?
To ensure the longevity of your dial indicator, several maintenance practices should be followed:
- Regular Cleaning: Keeping the dial indicator clean is crucial for accuracy and longevity. Dust and debris can accumulate on the dial, affecting readings and potentially causing mechanical wear.
- Proper Storage: Storing the dial indicator in a protective case prevents damage and exposure to contaminants. It is best to keep it in a dry environment to avoid rust and corrosion.
- Calibration Checks: Regularly checking the calibration of your dial indicator ensures that it provides accurate measurements. Performing calibration checks can identify any issues early, allowing for timely adjustments or repairs.
- Gentle Handling: Dial indicators are precision instruments that can be easily damaged if dropped or mishandled. Always handle them with care, and avoid applying excessive force during measurements.
- Lubrication of Moving Parts: Occasionally lubricating the moving components helps to reduce friction and wear. Use a specific lubricant recommended for precision instruments to maintain smooth operation.
- Inspecting for Wear: Regularly inspecting the indicator for signs of wear or damage can help prevent further issues. Look for any cracks, bent components, or irregularities in the dial that could affect performance.
Which Dial Indicators Are Highly Recommended for Table Saw Users?
The best dial indicators for table saw users are essential tools for achieving precision in woodworking projects.
- Starrett 25-441J Dial Indicator: This model is highly praised for its accuracy and durability.
- Mitutoyo 513-402 Dial Indicator: Known for its high-quality construction and precise measurements, it is a favorite among professionals.
- Grizzly H7582 Dial Indicator: This affordable option offers solid performance and is great for hobbyists and beginners.
- Brown & Sharpe 7032-1 Dial Indicator: Renowned for its reliability, this indicator is widely used in various industries, including woodworking.
- iGaging 35-101-1 Dial Indicator: This versatile tool is appreciated for its easy readability and compact design.
Starrett 25-441J Dial Indicator: This dial indicator is celebrated for its exceptional precision, with a measurement range of 0 to 1 inch and a resolution of 0.001 inch. The sturdy construction ensures longevity, making it ideal for frequent use in a workshop environment.
Mitutoyo 513-402 Dial Indicator: This indicator features a 0.001-inch resolution and a total range of 0 to 1 inch, providing reliable and repeatable measurements. Its robust design is complemented by a smooth movement, which allows for easy reading and adjustment, making it suitable for professional woodworkers.
Grizzly H7582 Dial Indicator: An economical choice, this dial indicator offers decent accuracy with a range of 0 to 1 inch and a resolution of 0.001 inch. It is particularly favored by hobbyists due to its affordability and sufficient performance for woodworking tasks.
Brown & Sharpe 7032-1 Dial Indicator: This model is known for its consistent accuracy and solid build quality, featuring a 0 to 1 inch range with 0.001 inch resolution. It is preferred by many woodworkers for its ease of use and reliable readings, making it a staple in many workshops.
iGaging 35-101-1 Dial Indicator: With its user-friendly design and clear dial face, this indicator stands out for its readability. It offers a range of 0 to 1 inch with a 0.001 inch resolution, making it a practical choice for those who need a compact and efficient tool for precise measurements in woodworking projects.
Related Post: