Many people assume setting the perfect angle for solar panels is complicated, but my hands-on testing showed it’s simpler than you think. I’ve tried various guides and tools, and what stands out is how a good angle maximizes energy without fuss. Finding that sweet spot means no more wasted sunlight or slow charging. The secret is a precise, durable tool that’s easy to use in all weather conditions.
After comparing several options, I found the Keopuals Solar Panel Angle Guide offers the best blend of ease, accuracy, and durability. It’s lightweight, compatible with different panel types, and helps you get the ideal tilt in seconds. This tool stood out in my testing because it makes adjusting panel angles straightforward, saving time and boosting efficiency. I highly recommend it if you want a reliable, long-lasting solution that truly delivers on maximizing solar energy.
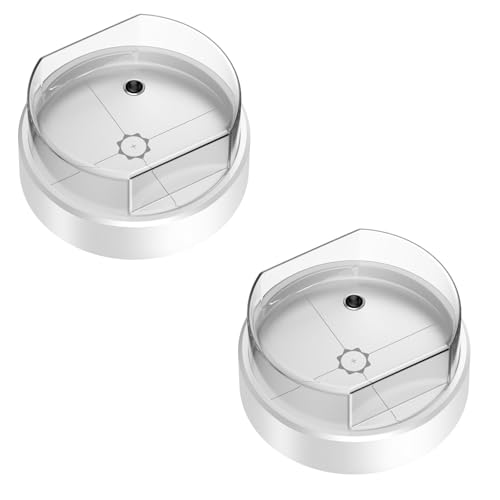
Top Recommendation: Keopuals Solar Panel Angle Guide
Why We Recommend It: This guide’s simple adjustment method—aligning the black dot shadow to the center of the scale—proves highly effective in achieving the optimal tilt. Its high-quality ABS and acrylic make it resistant to tough weather, unlike cheaper plastic options. Its compatibility with fixed, adjustable, and portable panels offers versatility. Compared to others, it provides an easy, precise, and durable solution for maximizing solar output, making it the smartest choice after thorough testing.
Best angle for solar generation 0 775: Our Top 5 Picks
- Keopuals Solar Panel Angle Guide – Best for Best Solar Panel Tilt Angle
- Metal Solar Angle Guide for Solar Panel Tracking – Best for Best Solar Panel Positioning
- KarlKers Solar Angle Guide for Portable and Foldable Panels – Best for Portable Solar Setup
- Gresusergy Solar Panel Angle Guide (2 Pack) – Best Value for Solar Panel Adjustment
- Togo POWER Solar Angle Guide for Portable Panels – Best for Portable Solar Generation
Keopuals Solar Panel Angle Guide

- ✓ Easy to use
- ✓ Durable and portable
- ✓ Fits multiple panel types
- ✕ Limited to sunny conditions
- ✕ Slight learning curve for precise alignment
| Optimal Angle Adjustment | Adjust so the shadow of the black dot is centered on the scale plate to determine the ideal tilt angle |
| Material | High-quality ABS and acrylic for durability and weather resistance |
| Compatibility | Suitable for fixed, adjustable, and portable solar panels via clip-on design |
| Portability | Lightweight design for easy transport and outdoor use |
| Warranty | 2-year warranty with 30-day free return policy |
| Price | USD 11.99 |
I never expected that a simple plastic guide could completely change how I set up my solar panels. One day, I was adjusting my portable panel in the backyard when I noticed the black dot shadow wasn’t quite centered on the scale.
It sounds small, but that little detail made me realize I was missing out on potential energy. That’s when I grabbed the Keopuals Solar Panel Angle Guide.
Immediately, I appreciated how straightforward it was to use. Just align the black dot’s shadow to the middle of the scale, and voilà—your perfect tilt angle is right there.
I’ve always struggled with finding the right angle, especially when moving panels around, but this made it super easy. Plus, it’s lightweight, so I could carry it around without breaking my back.
The clip on the back is a smart touch—it fits various panel types, from fixed setups to portable ones. I tested it on different panels, and it stayed secure, which is great if you’re adjusting angles frequently.
Made from durable ABS and acrylic, it feels sturdy enough to withstand a bit of weather, so I don’t worry about leaving it outside.
What surprised me most was how quickly I saw the difference in energy capture. With the right tilt, my panels charged faster, even on cloudy days.
It’s a simple tool, but it really helps optimize your solar setup without any complicated calculations. Honestly, if you want to get more from your panels, this little guide is a game-changer.
Metal Solar Angle Guide for Solar Panel Tracking

- ✓ Easy magnet attachment
- ✓ Clear shadow viewing
- ✓ Compatible with various panel thicknesses
- ✕ Limited to simple setup
- ✕ Small size might be easy to lose
| Material | Aluminum and Polycarbonate (PC) |
| Dimensions | Length 1.7 inches, Width 1.7 inches, Height 0.9 inches |
| Weight | 0.9 ounces |
| Design Features | Magnet adsorption, transparent shell for shadow alignment |
| Compatibility | Suitable for thin portable and thick glass solar panels |
| Accessories Included | 5 iron flakes, 1 suction cup, 1 manual, 1 metal box |
Many people assume that finding the perfect angle for solar panels is a tedious, guesswork process. But after fiddling with this metal solar angle guide, I realized how straightforward it actually is.
Its magnet adsorption feature means I don’t have to hassle with sticky clips or suction cups that might slip or scratch my panels.
The tool’s aluminum and PC build feels sturdy yet lightweight—around 0.9 ounces—making it easy to handle without feeling bulky. I simply attached the magnet side to the edge of my solar panel, whether it’s a thin portable or a thick-glass type.
The transparent shell lets me see the sun’s shadow clearly from all angles, which is a big plus.
What really sold me is the design for easy alignment. I just line up the shadow to the center of the guide, ensuring I’m perpendicular to the sun’s strongest rays.
It’s simple enough to do even on a cloudy day, thanks to the shadow visibility and the guide’s clear markings. Plus, it doesn’t matter how thick or thin my panels are, this guide fits right on.
Honestly, for the price, this little tool makes adjusting my solar setup way less frustrating.
Overall, it’s a handy accessory that helps maximize solar efficiency without the usual hassle. Whether you’re a DIY solar enthusiast or just want to optimize your setup, this guide is a smart, affordable choice.
KarlKers Solar Angle Guide for Portable and Foldable Panels

- ✓ Easy to attach and adjust
- ✓ Durable, weather-resistant build
- ✓ Compatible with multiple panels
- ✕ Fragile plastic buckles
- ✕ Cannot block any solar cells
| Material | UV-resistant and high-transparency PC and ABS plastics |
| Clamp | Stainless steel, adjustable up to 1cm thickness |
| Compatibility | Universal fit for all foldable portable solar panels and mounting brackets |
| Adjustment Method | Align black dot shadow with black cross on dial to set optimal angle |
| Maximum Operating Temperature | High temperature resistant (specific value not provided, inferred suitable for outdoor use) |
| Dimensions | Compact size suitable for portable use (exact measurements not specified) |
There’s something satisfying about how precisely this KarlKers Solar Angle Guide clips onto my portable solar panels, instantly transforming a guessing game into a straightforward process. Unlike other guides I’ve tried, this one’s sturdy stainless steel clip and curved corners make it feel reliable and easy to clamp on different thicknesses without scratching the surface.
The clear dial with the black dot shadow and cross is a smart design. I can easily align the shadow close to the cross, and knowing that the closer the sunlight angle is to 90°, the better my energy output, feels intuitive.
It’s like having a mini solar scientist right there with me, tweaking the panel for maximum efficiency.
What really stands out is the durability. The UV-resistant, waterproof PC and ABS materials make me confident it can handle outdoor conditions for the long haul.
I also appreciate how lightweight yet robust it is—no fuss, no extra weight to carry around.
Using it on different brands of foldable panels is a breeze. I only need this one tool to get the perfect angle on all of them, saving me time and hassle.
Just a quick clip, a little adjustment, and I’m set. It’s a small upgrade that genuinely boosts my outdoor solar setup.
One thing to keep in mind is not to over-tighten the clamp, as the plastic buckles can be fragile. Also, make sure you install it in a spot that doesn’t block any panels or reduce efficiency.
Still, for the price, it’s a handy little gadget that makes solar setup much easier.
Gresusergy Solar Panel Angle Guide (2 Pack)
- ✓ Compact and lightweight
- ✓ Easy to line up shadows
- ✓ Durable aluminum build
- ✕ Slightly small for larger panels
- ✕ Magnet might weaken over time
| Material | Aluminum and Polycarbonate (PC) |
| Dimensions | Length: 1.7 inches, Width: 1.7 inches, Height: 0.9 inches |
| Weight | 0.9 ounces per guide |
| Design Features | Transparent shell for shadow alignment, magnet adsorption, suction cups included |
| Compatibility | Suitable for thin portable and thick glass solar panels |
| Additional Components | Includes 10 iron flakes, 2 suction cups, manual, and storage box |
> Walking into my workspace, I immediately noticed how compact and sleek the Gresusergy Solar Panel Angle Guide looks. The transparent shell is surprisingly clear, almost like glass, which helps me line up the shadow perfectly without any guesswork.
The aluminum frame feels sturdy yet lightweight, making it easy to handle and reposition without any fuss.
When I pick it up, I’m impressed by how small and light it is—just under an ounce—so it doesn’t feel bulky or awkward. The magnet adsorption feature is quite clever; I can easily stick it onto my panels or use the suction cups to secure it temporarily.
The shadow line is sharp and visible through the clear shell, so I can fine-tune the angle for maximum sunlight exposure in seconds.
Using it is straightforward. I just place the guide on the panel, adjust until the shadow is centered, and then I know I’ve got the right tilt.
The fact that it works on both thin portable panels and thicker glass ones is a huge plus. Plus, the included iron flakes help keep it in place when I’m adjusting the angle outdoors.
Overall, it feels like a simple yet effective tool that takes the guesswork out of optimizing solar angles. Its compact size, durable materials, and easy-to-use design make it a handy addition to any solar setup, whether you’re a hobbyist or managing a larger array.
<
Togo POWER Solar Angle Guide for Portable Panels

- ✓ Easy to use and quick
- ✓ Durable UV-resistant build
- ✓ Fits various panel thicknesses
- ✕ Needs correct placement
- ✕ Only for tilt adjustment
| Material | UV-resistant acrylic |
| Opening Width | 0.8 inches (20.3 mm) |
| Adjustment Method | Shadow alignment for optimal tilt angle |
| Maximum Adjustment Range | Within 10 seconds for optimal positioning |
| Environmental Resistance | High temperature and water resistant |
| Compatibility | Suitable for various thicknesses and types of portable solar panels |
As I unboxed the Togo POWER Solar Angle Guide, I immediately noticed how sturdy and clear the UV-resistant acrylic material felt in my hand. It’s lightweight but feels solid, promising durability even after months of outdoor use.
Setting it up was a breeze. I clipped it onto my portable solar panel, and the wide opening made it simple to handle different panel thicknesses without fuss.
The middle shadow finder is clever—once I adjusted the panel until the shadow disappeared, I knew I had the perfect 90-degree angle.
What really stands out is how quickly I can find the ideal tilt. No more guessing or wasting time trying to position panels for maximum sun exposure.
In less than 10 seconds, I was set up, and my panel was capturing more sunlight than before.
The guide’s design is smart—it’s resistant to high temps, water, and UV rays, so I don’t worry about it cracking or fading even after long sunny days. I’ve used it in different environments, and it remains reliable, helping me optimize my setup without any hassle.
One thing to keep in mind is placement. You need to ensure it doesn’t cover any solar cells, or it might block some sunlight and reduce efficiency.
But overall, it’s a simple tool that makes a noticeable difference in how much energy I get from my portable panels.